
Core Audio: a quick example using Extended Audio File Services
This post is more a reminder to myself: every now and then I keep running into Core Audio – and need to start all over again, cause I can hardly remember anything from the last encounter… Yes Core Audio is quite convoluted as it goes very deep, but it opens a lot of possibilities.
For this project I wanted to make use of the automatic file conversion capabilities of Core Audio – which supposedly is not the most complicated use case – and next to the usual, invaluable, while in the meantime slightly outdated help resource “Learning Core Audio” by Adamson and Avila, the internet already offers a number of coding examples showing how format conversions can be done, converting e.g. a MP3 file to a file with linear PCM format and so on.
But to give it a little twist, I wanted to find out how we could export raw audio samples residing in memory to an audio file with compressed format. The process is almost the same as described in the usual audio converter examples, but not quite – and lame as I am, it took me some time to find out the fine adjustments that needed to be made.
So hopefully this example can serve as a little memory hook for using Extended Audio File Services to accomplish the task.
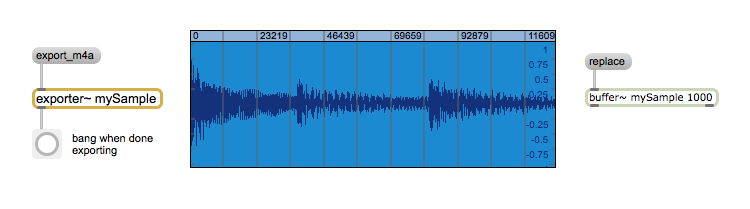
As a practical use case let’s implement the desired functionality in a little external object for MaxMSP, that can access the raw audio samples residing in a buffer~ object and export those to an mpeg4/aac file. To keep it simple, no attention will be paid to possible threading issues etc. The complete code can be found on github.
Here is an outline of the steps to be taken:
- fill out AudioStreamBasicDescriptions (asbd) for the source and the destination formats
- create an output file reference (ExtAudioFileRef) with the destination format
- set the client data format using the source asbd
- create a destination buffer and wrap it in an AudioBufferList
- copy the source sample data to the destination buffer in blocks and write them to the output file (ExtAudioFileWrite)
- clean up
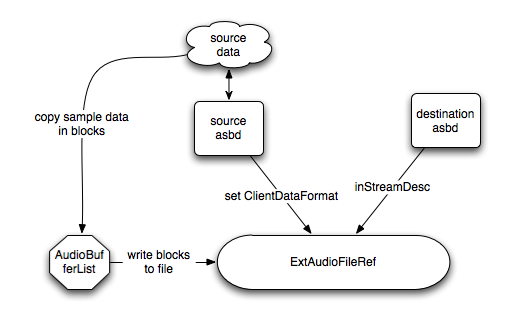
Step 5 can be simplified in most cases: we don’t really need to copy the source data to the destination buffer. We can simply let the AudioBufferList’s mData point to the source data with appropriate offsets.
By the way, the necessary conversion work is done for us automatically behind the scenes by the Extended Audio File Services – quite convenient.
Filling out AudioStreamBasicDescriptions for the source and the destination formats
Although MaxMSP uses double precision for audio processing, a buffer~ stores it’s samples still as 32bit floats. So our source format is always linear PCM with 32 bits per channel.
|
1 2 3 4 5 6 7 8 9 10 11 12 13 |
AudioStreamBasicDescription sourceFormat = {0}; AudioStreamBasicDescription exportFormat = {0}; buf = buffer_ref_getobject(x->bufref); // a reference to our source samples frames = buffer_getframecount(buf); // number of audio frames in samples nchnls = buffer_getchannelcount(buf); // number of channels sr = buffer_getsamplerate(buf); // get sample rate // fill in the source format createCanonicalFormat(&sourceFormat, sr, nchnls); // fill in the destination format createM4aFormat(&exportFormat, exportSR, nchnls); |
Zeroing out the AudioStreamBasicDescription structure before populating the specific fields is a good idea, as with some formats we don’t know (and can’t know) every single field in advance and need to set those to zero anyway.
|
1 2 3 4 5 6 7 8 9 10 11 12 13 14 15 16 17 18 19 20 21 |
void createCanonicalFormat(AudioStreamBasicDescription *format, double sr, int nchnls) { // 32bit floating point format->mFormatID = kAudioFormatLinearPCM; format->mChannelsPerFrame = nchnls; format->mSampleRate = sr; format->mFormatFlags = kAudioFormatFlagsCanonical; format->mFramesPerPacket = 1; // uncompressed is always 1 packet per frame format->mBitsPerChannel = 32; format->mBytesPerPacket = format->mBytesPerFrame = 4 * nchnls; } void createM4aFormat(AudioStreamBasicDescription *format, double sr, int nchnls) { // m4a format->mFormatID = kAudioFormatMPEG4AAC; format->mChannelsPerFrame = nchnls; format->mSampleRate = sr; format->mFormatFlags = kMPEG4Object_AAC_Main; // leave out the rest } |
A frame is a collection of time-coincident samples. For instance, a linear PCM stereo sound file has two samples per frame, one for the left channel and one for the right channel. Most audio files store their data in “interleaved format”, which means, that the frames are stored one after the other, so the sample bytes of respective channels alternate in a single stream.
In an uncompressed format we always have one packet per frame. In compressed formats this is different and as we don’t know anything about it, we let the Extended Audio File Services figure that out for us, by leaving those fields blank.
Create an output file ref and set source and destination formats
Next we create an output file with the correct destination format.
|
1 2 3 4 5 6 7 8 9 10 11 12 13 |
// create output audio file ------------------------ CFURLRef outputFileURL = CFURLCreateWithFileSystemPath(kCFAllocatorDefault, x->outputFileStringRef, kCFURLPOSIXPathStyle, false); ExtAudioFileRef outputFileRef; err = ExtAudioFileCreateWithURL((CFURLRef)outputFileURL, x->fileType, &exportFormat, // set our destination format NULL, kAudioFileFlags_EraseFile, &outputFileRef); |
The next step is very important! We must tell the ExtAudioFile API the format that we will be sending samples in, i.e. we tell it the source format by using a call to
ExtAudioFileSetProperty
In Core Audio this is called
ClientDataFormat – which I find slightly confusing…
|
1 2 3 4 5 |
// tell the ExtAudioFile API what format we'll be sending samples in!!!!!!!!!!!! err = ExtAudioFileSetProperty(outputFileRef, kExtAudioFileProperty_ClientDataFormat, sizeof(sourceFormat), &sourceFormat); |
Fill destination buffer in blocks and write to output file
Ok, now we are actually ready to start the conversion and write the resulting audio data to the output file.
|
1 2 3 4 5 6 7 8 9 10 11 12 13 14 15 16 |
tab = buffer_locksamples(buf); // access samples in buffer if (!tab) { goto out; } int result = convertAndWriteToDisk(tab, frames, nchnls, outputFileRef); if (result) { object_error((t_object *)x, "sorry, can't write packets to file - aborting..."); } // clean up, we're done! buffer_unlocksamples(buf); outlet_bang(x->outA); out: ExtAudioFileDispose(outputFileRef); |
Don’t forget to call ExtAudioFileDispose when you are done with it.
Let’s have a closer look at convertAndWriteToDisk function:
|
1 2 3 4 5 6 7 8 9 10 11 12 13 14 15 16 17 18 |
int b, offset; UInt32 frameCount = 8192; // number of frames to write in one block UInt32 frameBlocks = frames / frameCount; // number of _complete_ blocks UInt32 frameRest = frames - (frameBlocks * frameCount); // last block is smaller // wrap the destination buffer in an AudioBufferList AudioBufferList convertedData; convertedData.mNumberBuffers = 1; convertedData.mBuffers[0].mNumberChannels = nchnls; convertedData.mBuffers[0].mDataByteSize = frameCount * nchnls * sizeof(float); for(b=0; b<frameBlocks; b++) { offset = b*frameCount*nchnls; convertedData.mBuffers[0].mData = pcmData+offset; err = ExtAudioFileWrite(outputFileRef,frameCount, &convertedData); if(err) { post("Couldn't write packets to file"); return 1; } } |
The call to
ExtAudioFileWrite is not only writing samples to a file but also taking care of necessary format conversions. For this to work we need to hand it over an
AudioBufferList which contains blocks of samples that we want to write to disk.
So first we create an
AudioBufferList (“convertedData”) – as the whole process is an offline task, one buffer is ok for this – make sure the number of channels match and there is enough space to hold one block of samples (in the original format, which is float32!).
Then before handling over the
AudioBufferList to
ExtAudioFileWrite we need to fill its destination buffer repeatedly with a block worth of sample data. We can do this by actually copying the original sample data (“pcmData”) to the destination buffer
mData , or simply by letting it point to the original pcmData with the appropriate block offsets, like in the example above.
The last block of audio samples is most likely going to be a little smaller, as the number of exported samples will probably not be an exact integer multiple of the chosen block size, so some special care must be taken here.
|
1 2 3 4 5 6 7 8 |
// and copy the rest offset += (frameCount*nchnls); convertedData.mBuffers[0].mData = pcmData+offset; convertedData.mBuffers[0].mDataByteSize = frameRest * nchnls * sizeof(float); // have to change byte size! err = ExtAudioFileWrite(outputFileRef, frameRest, &convertedData); if(err) { post("Couldn't write last packet to file"); return 1; } |
OK, that’s it! Hope this is helpful.
The complete code can be found on github.
Where can I get an updated version of this example using Swift?